New cases, including both direct and indirect disputes, can be assigned to a Queue and a Case Lead automatically based on routing logic set by administrative users. These Auto-Dispatch Rules evaluate each case according to the configured criteria so that it can be associated with the correct Queue. If the rules aren't met, the case can still be routed to a default Queue by setting up a Default Association. To further expedite the Case Dispatch process, assignment of a Case Lead can be automated as well, by designating one of the Auto-Assignment Methods offered.
If manual review and dispatch of cases is preferred, there is a No Queue option available.
Administration Guide
Who Can Use this Feature?
Management and use of this feature is available to all users with an Administrator license, by default. Users with a Standard license who have been granted Auto-Dispatch Rules site rights also have access to this feature.
Where Is It Set Up?
To access the Auto-Dispatch Rules page, click on the vertical sidebar menu. Then go to → .
Managing Auto-Dispatch Rules
Auto-Dispatch Rules are configured like a set of decision steps, each evaluating criteria from the case to determine if the value is true or false before proceeding to the next decision. When applied, new cases will be routed automatically to the appropriate Queues to be worked.
To set up a new Auto-Dispatch Rule, click
 to create a new, blank decision step.
Click anywhere on the decision step to open the configuration panel.
Provide an optional description.
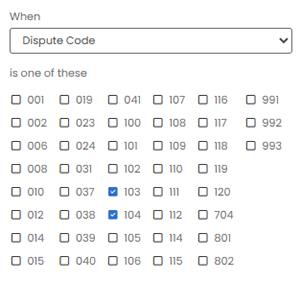
Choose the case data fields that should be evaluated by the decision logic. Using the When dropdown menu, select the values that make this rule true.
Example 1. Select Initial CriteriaIf a rule that will apply to all Fraud-related cases is needed, Case Central® can identify all new cases when the Dispute Code is either Dispute Code 103 or Dispute Code 104.
After setting up the criteria for inclusion, select the Queue that the matching cases should be assigned to. Open the Use Queue dropdown menu to pick the appropriate Queue.
Select one of the Auto-Assignment Methods from the Use Auto-Assignment dropdown menu to designate the methodology for assigning the Case Lead automatically. Choose None to bypass auto-assignment of the Case Lead and allow team members to pick cases from their Queue.
Click Save.
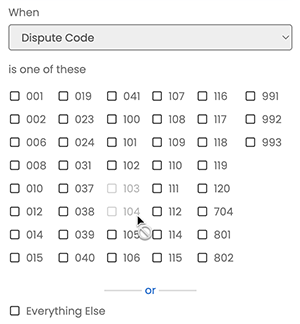
Create additional Auto-Dispatch Rules by creating new decision steps as needed. The data fields used as criteria for a previous decision step are no longer available to use in a following decision step. To apply a rule to the remaining values for a data field, choose Everything Else.
Example 2. Select Criteria for Alternate PathCases that did not meet the criteria for Fraud will be evaluated against the next Dispute Code or set of codes selected here as part of the definition of this rule.
Auto-Dispatch Rules are saved in real time but are not live until published. After creating or updating the rules, click Publish to make the new rules live in the system.
Note
If changes have been made but not published, a reminder will be shown.
