Case Central® offers customers a way to ensure team members follow approved processes to review relevant information and resolve disputes. These Investigation Checklists can be created in as many variations as needed and associated with each case based on dispute data values such as Dispute Code and/or Dispute Type. Once configured, Checklist Assignment Rules can be set up to ensure that the appropriate Checklist will be incorporated into each case record.
Each Investigation Checklist should be designed to manage the items team members need to verify for each dispute, including comparing data from multiple sources and reviewing any attached files. As each step of the Checklist is completed, Case Central® logs the actions taken and captures a snapshot of the data values at the time of the review, creating an audit trail to show that a thorough review of the case was made.
Checklist Building Blocks
Each Checklist includes one or more steps for the team member to complete. Each step contains some form of content that is presented to the user, such as an instruction, a question, or some data values to be reviewed. When building an Investigation Checklist, the admin user will select from a set of Content types before entering the unique content for that step. Case Central® will then use the designated Content type to determine the appropriate way to render the content when a team member is working a Checklist.
Case Central® supports a wide variety of Content types for the data fields used to collect information as part of an Investigation Checklist.
In order for the system to render the Checklist correctly, the format to be used for the response options in each step must be selected at the time it is configured. In addition to settings that may apply to only certain Content types, a setting to make the Content item Required is available on all Content types other than Instructions.
The following Content types are available for use:
Checkbox
Creates an item with a single checkbox. The checkbox precedes the label.
Example showing how it would appear to the team member working the Checklist:

Data Compare
The Data Compare content type pulls in data from the dispute source as well as the appropriate Source of Record, if set up as part of the Case Central® implementation process, allowing a team member to compare data values side-by-side. Which data fields are included depends on how the Investigation Checklist is set up, but typically include consumer details, account information, and dispute data fields.
Example showing how Data Compare appears to the team member working the Checklist:
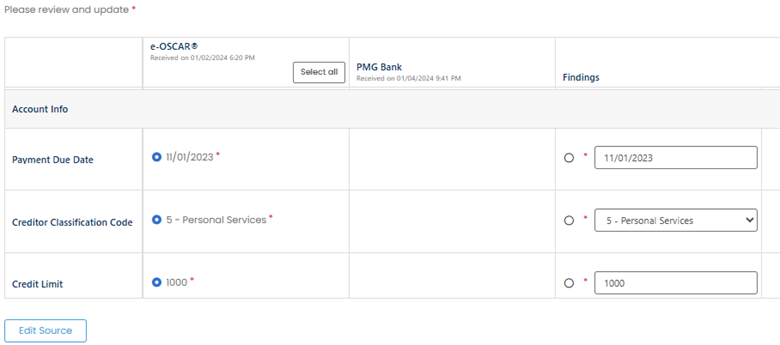
For each field, the system will compare the values returned from the data sources (if at least one integration to a Source of Record has been implemented). Any mismatches can be highlighted to call attention to those fields. The team member would then select or enter the correct value in the Findings column on the right.
Note
Date
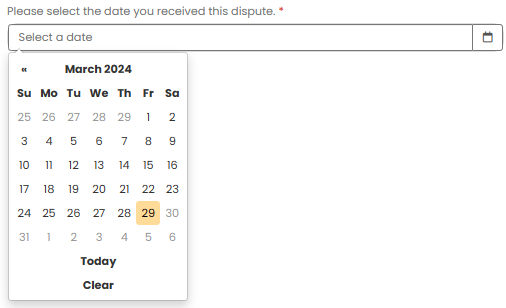
Creates an item where the end user is asked to enter a single date. The date may be entered manually or selected from the date picker.
Example showing how it would appear to the team member working the Checklist:
Instructions
Allows a user to create directions/instructions for the end user. This field allows for basic formatting of the text. Because the Instructions Content type does not prompt the case team member for input, there is no setting for making this Content item Required.

Example showing how it would appear to the team member working the Checklist:

Review Files
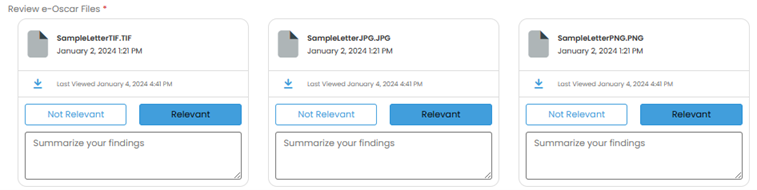
Allows a user to review files related to a case. They may be either e-OSCAR® files or files uploaded directly to the case. The end user can evaluate if the files are relevant or not relevant.
Example showing how it would appear to the team member working the Checklist:
Related Cases
Displays a table showing if there are any cases linked to the current case being reviewed. “No data available in table” will show if there are no related cases.
Example showing how it would appear to the team member working the Checklist:

Select List
Creates a field for a user to select an answer from a list of values. This Content type requires the administrative user to set up both the Label (or question) as well as the response options.
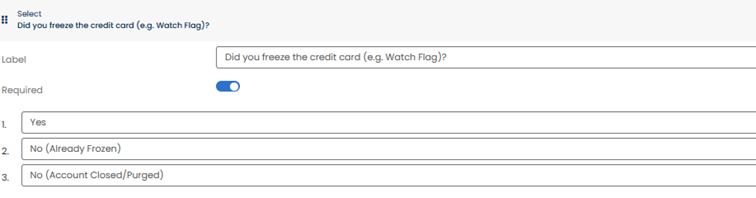
Example showing how it would appear to the team member working the Checklist:

Text Input
Allows a user to enter information into a single line text field. This is meant for brief responses.
Example showing how it would appear to the team member working the Checklist:

Text Area
Allows a user to enter information into a text field designed to hold larger amounts of data. This is meant for longer responses.
Example showing how it would appear to the team member working the Checklist:

User Defined Field
Allows a user to select a User Defined Field ( or UDF) to display on the checklist. To create a Checklist step with this Content type, the administrative will choose from a list of previously configured UDFs.
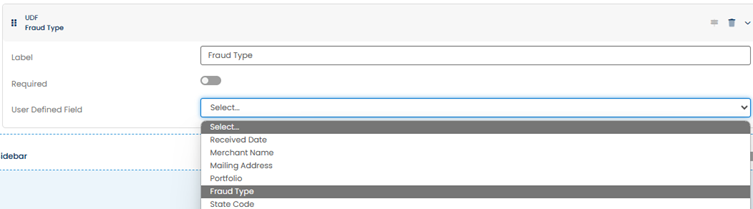
Example showing how it would appear to the team member working the Checklist:

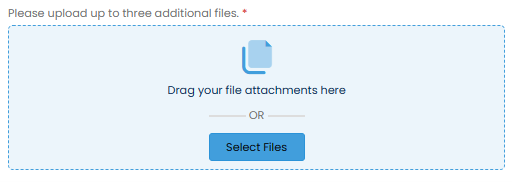
Upload Files
Creates a content item that allows an end user to upload additional files. The administrative user can set the maximum number of files that can be uploaded as well as whether the files can be downloaded by a team member.
Example showing how it would appear to the team member working the Checklist:
Yes/No Button
Creates a content item with a Yes/No button.
Example showing how it would appear to the team member working the Checklist:

Response Code Select
Creates a Content item that prompts the team member to enter the appropriate ACDV Response Code and then validate it. The administrative user can set this Content item to allow a case team member to resolve the case once this question has been completed.
When the Allow Case Resolution setting is enabled, the user completing the Checklist will be prompted to complete the Final Findings details for the case.
Example showing how it would appear to the team member working the Checklist:
First, the team member selects the ACDV Response Code value they believe is appropriate based on their investigation.

Second, if the Allow Case Resolution field has been enabled, the user selects the appropriate findings and results values.

If Allow Case Resolution is not enabled, the user would not be prompted to complete these fields and would go directly to the third step.
Third, the team member clicks the link to validate.

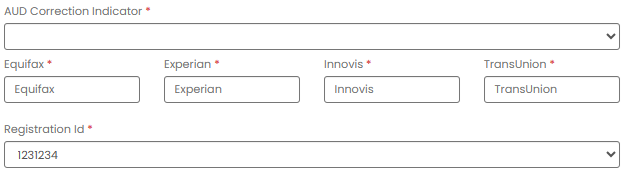
AUD Correction Indicator Select
Creates a Content item that prompts the team member to enter the appropriate AUD Correction Indicator Information and then validate it. The administrative user can set this Content item to allow a case team member to resolve the case once this question has been completed.
When the Allow Case Resolution setting is enabled, the user completing the Checklist will be prompted to complete the Final Findings details for the case. Additional fields in this Content type include Registration Id and the appropriate identifier for the service that supplied the dispute.
Example showing how it would appear to the team member working the Checklist:
First the team member selects the AUD Correction Indicator value they believe is appropriate based on their investigation and completes the other required fields.
Second, if the Allow Case Resolution field has been enabled, the user selects the appropriate findings and results values.
If Allow Case Resolution is not enabled, the user would not be prompted to complete these fields and would go directly to the third step.
Third, the team member clicks the link to validate.
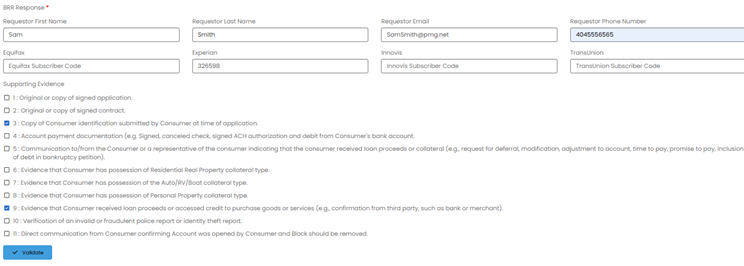
BRR Response
Creates a content item to be used in a Checklist step when the team member should submit a Block Rescission Request. The administrative user can set this Content item as Required and can also allow a case team member to resolve the case once this question has been completed.;
If the step is Required, values for certain data fields must be provided for the BRR to pass e-OSCAR® validation. In addition, when the Allow Case Resolution setting is enabled, the user completing the Checklist will be prompted to complete the Final Findings details for the case.
Example showing how it would appear to the team member working the Checklist:
First the team member completes the required BRR Response fields.
Second, if the Allow Case Resolution field has been enabled, the user selects the appropriate findings and results values.
If Allow Case Resolution is not enabled, the user would not be prompted to complete these fields and would go directly to the third step.
Third, the team member clicks the link to validate.
Associate Consumer
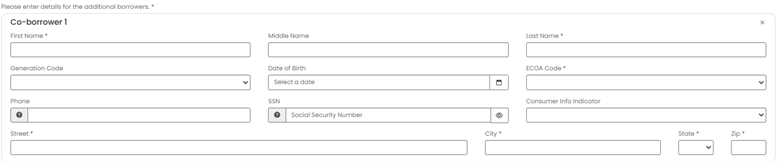
Creates a series of fields where an end user can enter information about additional borrowers. You may select whether or not you want to require a user to complete the information for one or two additional borrowers via the required mode on the field.
Example showing how it would appear to the team member working the Checklist:
Conditional Logic is a way for an individual to show or hide a Checklist content item based on a set of rules. This logic can be applied to a Checklist step or to specific content items within an individual step.
Case Central® offers two choices when configuring conditional logic: Basic or Advanced Mode. Basic conditional logic is all that is needed to create straightforward if/then logic, such as "When this [data value for a case] is this [condition], do this [action]." Enabling the Advanced Mode setting allows an admin user to create more complex rules for showing and hiding information based on an evaluation of multiple data values and multiple conditions.
Create Basic Conditional Logic
In the center section of the Checklist configuration page, click on the
 icon to open the panel.
If adding conditional logic to drive the inclusion of a Step, use the icon to the right of the Step title.

If adding conditional logic to drive the inclusion of a Content component within a Step, use the icon in the upper right corner of that Content item.

The read-only Name field will show the name of the Step or Content item.
Leave the Advanced Mode toggle switch in the disabled position.

Set the condition that needs to be met for that Step or Content item to be included in the Checklist workflow. Previous response values as well as certain other case data fields may be selected to drive the logic.
Choose the field that should be evaluated by clicking the Select Content button and picking from the list of Step fields and other case data fields shown.
Click the Select Condition button to enter or select the value that, when met, should drive the inclusion of the Step or Content item you are configuring. If the condition is not met, the Step or Content item will be skipped and not shown.
Example 1. Add Conditional LogicAn administrative user is creating a new Checklist to guide team members through a dispute investigation workflow. One of the steps prompts the Case Lead to upload additional files related to the case. However, it only makes sense to include that step if the team member has previously indicated that they have relevant files to add to the case record.
By adding conditional logic on the Upload Files step, the previous response drives whether or not the step to upload additional files is shown when the Checklist is worked.
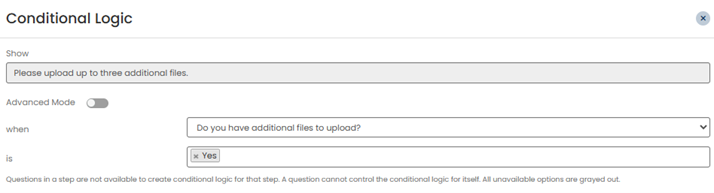
Review the configuration and make updates if needed.
Conditional Logic is automatically saved as it is built. When a Step or Content item contains Conditional Logic, the
icon will appear darker.If Conditional Logic needs to be removed, click the Clear Logic button in the lower left-hand corner of the panel.
Create Advanced Conditional Logic
In the center section of the Checklist configuration page, click on the
icon to open the panel.If adding conditional logic to drive the inclusion of a Step, use the icon to the right of the Step title.
If adding conditional logic to drive the inclusion of a Content component within a Step, use the icon in the upper right corner of that Content item.
The read-only Name field will show the name of the Step or Content item.
Enable Advanced Mode by clicking on
to move the toggle switch to the right position.
Set the conditions that need to be met for that Step or Content item to be included in the Checklist workflow. Previous response values as well as certain other case data fields may be selected to drive the logic. With Advanced Mode enabled, multiple criteria and operators other than "true" can be used to evaluate whether a condition has been met.
Choose whether the logic should behave like an AND statement or an OR statement. From the left dropdown, select All of these are true if you want all of the conditions built to be met, or select Any of these are true if any of the conditions being met would be sufficient.
Click
 to open a configuration area where the administrative user can select the case data field Name, the operator that should be used, and the value that, when met, should drive the inclusion of the Step or Content item you are configuring.
Continue to add criteria until you have fully built out your logic.

If the logic you need to build is more complex and needs to be a combination of AND and OR statements, you can click on
 , which will allow you build another layer of conditional logic within the original condition.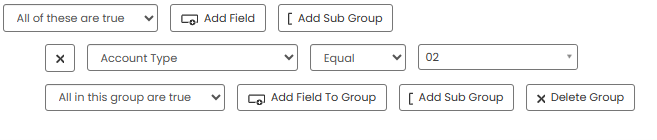
Review the configuration and make updates if needed.
Conditional Logic is automatically saved as it is built. When a Step or Content item contains Conditional Logic, the
icon will appear darker.If Conditional Logic needs to be removed, click the Clear Logic button in the lower left-hand corner of the panel.
Checklist Configuration Best Practices
Before setting up Investigation Checklists, map out the workflow for each different investigation process, the data needed to review a dispute, and what other pieces of information might be important to the various steps.
When adding or updating related system settings, think through the naming conventions that are used in your organization and what types of reports will be useful to your team and management stakeholders.
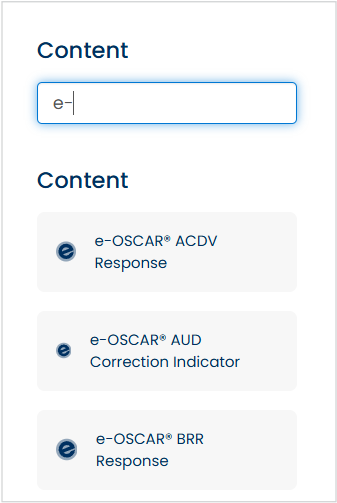
To help quickly locate the appropriate content type during configuration, you can use the Content Search box to filter the list.
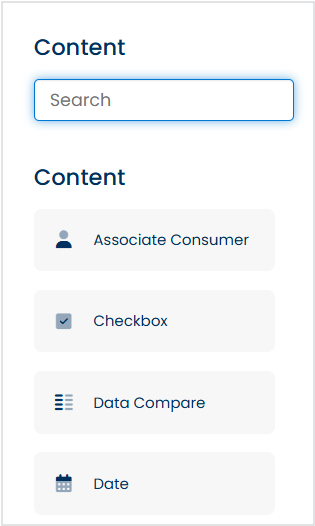
Simply begin typing a keyword or content name, and the system will narrow down the list in real time. Content types are displayed in alphabetical order by default.
Case Central® offers the ability to resolve a case directly from an Investigation Checklist. This provides for additional process efficiency for some organizations by eliminating the need to return to the page to select Resolve Case from the Update Status dropdown.
Three Content types include the Allow Case Resolution configuration setting to automate validation and submission of the response details to e-OSCAR®:
e-OSCAR® ACDV Response
e-OSCAR® AUD Correction Indicator
e-OSCAR® BRR Response
Important
The Content item with Allow Case Resolution enabled must be on the last step of an Investigation Checklist.
Administrative users can enable the Allow Case Resolution setting by moving the toggle switch to the right position.

When enabled, the findings fields configured for Resolution States will be appended to the Content item so that the case team member can fill out the appropriate values as required to resolve the case.
Note
If your organization has QA Review Threshold Rules set, and the case is selected for QA Review, the case will not automatically be resolved even if Allow Case Resolution is enabled. The case will be sent for QA Review first.
Data Compare
When using a Data Compare content item, it is best to use it alone within its own step, since it typically contains a long list of data fields.
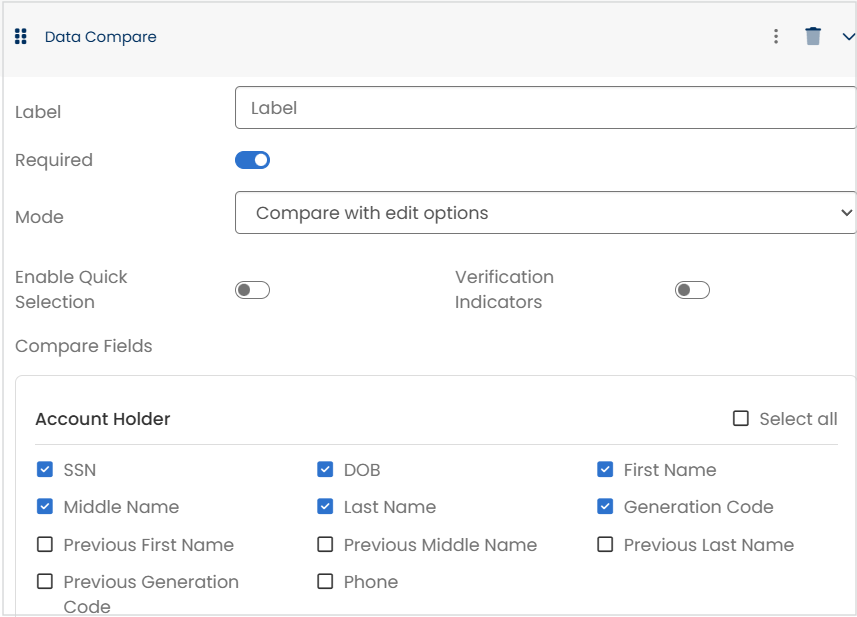
Several additional configuration options are available when setting up a Data Compare content item. They control certain aspects of how the step will be displayed to the team member working the case and what their response options are.
Mode
Select Compare with edit options to allow a team member to enter or edit values presented in the Data Compare interface.
Select Cumulative read-only mode to display the data as read-only and restrict team members from editing the values. This setting can be used when you want to show a confirmation screen or display certain fields without allowing the end user to edit their values.
Note
The Enable Quick Selection and Verification Indicators toggle switches are only visible when Compare with edit options is selected for the Mode.
Enable Quick Selection
The Enable Quick Selection setting allows users to quickly apply values in bulk in the Data Compare interface.
Leave the toggle switch in the disabled position
 to require each field from the dispute source to be validated and marked as accurate individually.
To allow the team member to accept field values in bulk, move the toggle switch to the right position
 to select Enable Quick Selection. This setting places a Select All button in the Origination Record and System of Record columns, which enables the end user to copy all of the values from that source column into the Findings column with one click.
Verification Indicators
To display visual flags identifying the match status of various fields, move the toggle switch to the right position
.Leave the toggle switch in the disabled position
if Verification Indicators are not wanted.
Compare Fields
Selecting which fields to include in the Data Compare should be driven by how the Investigation Checklist is expected to be used.
For example, if the Checklist is being used for disputes coming in through an e-OSCAR® Registration ID that are associated specifically with student loan data, then it wouldn't make sense to include mortgage-related data fields in the Data Compare content item.
Note
The list of data fields that can be selected is broken into groups, with related fields listed below each section heading. These Sections and the data fields available to be selected for a Data Compare content item are managed globally via the Data Compare Configuration feature.
e-OSCAR® BRR Response
When completing a BRR Response item on a Checklist, certain information is required from the team member in order to successfully complete the step. Administrative users should consider including this information along with any other instructions that may be helpful to end users when configuring a BRR Response on a Checklist.
Helpful information:
At least one Subscriber Code is required.
The Supporting Evidence list allows for multiple selections.
Be sure to validate your response before saving and exiting the Checklist.

Create an Investigation Checklist
From the page, click the
 dropdown in the upper right-hand corner of the screen. Select Add Checklist to open the panel.
Enter a Name for the new Checklist and click Create to open the Checklist configuration page.
The page will load with three panels.
The Step List on the left shows each step of the Checklist that the investigating team member is expected to follow. Initially, the first step will have a placeholder title of New.
The middle panel has fields for the Name and Description of each step. It also contains a configuration box titled Main Area where the selected Contents are configured.
The righthand panel contains the list of Content types that are available for use in the configuration of each step.
Type the name of the first step in the Add title field.
For example, if you wanted the first step to be Instructions, you may enter Instructions as the title for the first step.
Next, drag and drop the fields you want to collect in the first step from the right-hand side of the screen into the Main Area box. Once dropped inside the configuration area, each Content item will pop open with the fields that are relevant for setting up that Content type.
Refer to the list of Content Types for brief descriptions of the available options.
Configure each Content item in the configuration boxes.
Update the Label for the fields.
By default, all of the fields are optional, but you can set them to Required by clicking the
icon to move the toggle switch to the right position.Note
The Instructions field type has no required setting as it is just informational.
Complete any remaining configuration settings. Some Content types require additional information to complete their setup. See Tips for Specific Content Types for pointers on how to set these up.
Review the setup for the step and make updates as needed.
Change the order of the Content fields by moving them up or down in the Main Area as needed. For easier reordering - especially if you have multiple Content fields - click the
 icon on each field to temporarily collapse it.
If an added field should be removed, click the
 icon to delete the field from the step. The system will prompt for confirmation before removing it.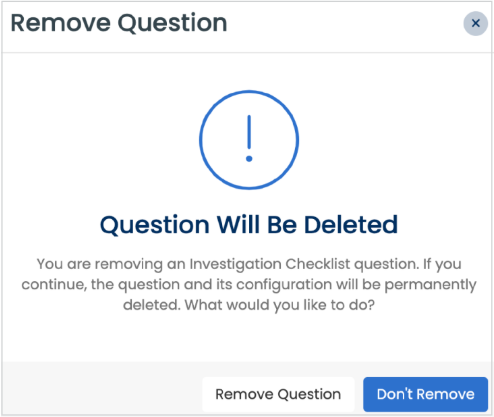
When the first step is complete, click the
 icon on the Step List to add another step. Repeat the process for as many steps as needed for the Checklist.
Once all the steps have been added and are fully configured, review the Checklist and make any necessary final changes. If the order of the steps isn't correct, they can be reordered by moving them up or down in the Step List.
Click
 to publish the Checklist.