Administrative users can create and manage rules that govern which Investigation Checklist should be assigned to a particular case.
These Checklist Assignment Rules use business logic to evaluate the values contained in various data fields, including Case Category, DIspute Code or DIspute Reason, Queue, Account Type, Account Status, and other case information.
This feature also allows administrative users to set a default Checklist for the system, but then specify under what conditions other record sources should be used.
Checklist Assignment Rules are set up as a sequence of one or more decision steps, each evaluating a data point from the case to determine if the value meets the defined criteria before proceeding to the next step. When a rule is met, it is applied and assigns the appropriate Checklist to the case.
Administration Guide
Who Can Use this Feature?
Management and use of this feature is available to all users with an Administrator license, by default. Users with a Standard license who have been granted Checklist Assignment Rules site rights also have access to this feature.
Where Is It Set Up?
To access the page, click on the vertical sidebar menu. Then go to → .
Default Association
Associating a Checklist to a Case by Default
Default Associations are applied when none of the configured routing rules matches the details of the case. By designating a default Checklist, a Case Lead won't have to select one manually. This is more efficient and avoids the possibility of the wrong Investigation Checklist being assigned or of a case being worked without following an approved process.
However, if manual assignment is preferred, the No Checklist option, which is selected by default, can remain selected.

Set a Default Association
Click
 next to Set Checklist.
From the dropdown, select the name of the published Checklist you want to set as the Default Checklist.
Click Save,
Helpful Tips
Plan Ahead
Before setting up the Checklist Assignment Rules, make sure that Investigation Checklists have been created to meet all of the organization's requirements.
Plan out the business logic that should be used to determine the appropriate dispute investigation process for a case. Define the rules before creating them in the system.
If you do happen to mistakenly create or delete a decision step, use the  buttons to go back a step or forward again.
Don't Forget to Publish
Changes made to Checklist Assignment Rules are saved in real time but are not live until they have been published.
If a rule has been added but isn't fully configured, the  icon will appear on the decision step. Case Central® will not allow improperly configured Checklist Assignment Rules to be published.
Only Checklists that have been published can be set as a Default Checklist.
Leverage Migration Tools
Case Central® makes it easy to move Checklist Assignment Rules settings from one environment to another. Use the Export and Import actions to migrate a published configuration from Dev to Test to Prod or whichever direction you need.
The required format for Checklist Assignment Rules configuration documents is JSON.
Managing Checklist Assignment Rules
Click the
 icon on the Start tile to create a new, blank decision step.
Click anywhere on the new step to open the configuration panel. A Description field is provided, but optional.
Define the initial business logic.
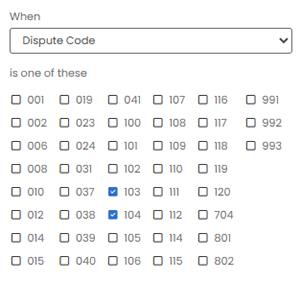
Select the data field to be evaluated using the When dropdown. Choose the data values that would make the rule true.
Example 1. Select Initial CriteriaIf a rule that will apply to all Fraud-related cases is needed, Case Central® can identify all new cases when the Dispute Code is either Dispute Code 103 or Dispute Code 104.
Select the Checklist that should be assigned to the matching cases from the Use Checklist dropdown.
Click Save.
Define the outcome for cases not meeting the previous criteria. Create a new rule by clicking the
icon on the Start tile again. A new, blank decision step will open following a separate path from Start.Click anywhere on the new step to open the configuration panel. A Description field is provided, but optional.
Define the business logic to be applied when the initial rule is false.
The data field that was chosen for the first path will now be pre-selected for the When field, and the previously selected values will no longer be available for selection.
Example 2. Select Criteria for Alternate PathCases that did not meet the criteria for Fraud will be evaluated against the next Dispute Code or set of codes selected here as part of the definition of this rule.
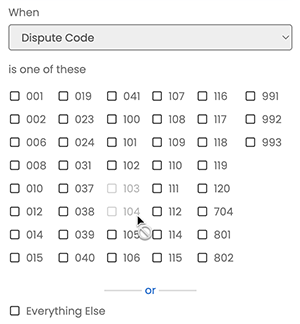
Select the values that the make the rule true for this new path. To assign all remaining cases that have not met the previously evaluated criteria for the selected data field, choose Everything Else.
Click Save.
To refine the decision logic further, create additional rules by adding new decision steps that follow an existing step. Data fields previously selected for evaluation from the When dropdown will not be available for selection on subsequent paths.
Once configuration for all rules has been completed, click Save.
To delete a Checklist Assignment Rule, click the  icon. This will remove the decision step.
Publish Rules
After creating or updating the Checklist Assignment Rules, click Publish to make the new rules live in the system.
Note
If changes have been made but not published, a reminder will be shown.

View Published Versions
Click the
 icon to see the menu.
Select Show Published Versions to see a list of previously published Assignment Rules.
Click the
 icon to download them.
To return to the rules creation screen, click the
icon again and select Show Edit View.
Export
Click the
icon to open the menu and select Export.You will receive a message prompting you to either open or save the file.
Save the file if you plan on importing it into another Case Central® environment later.
Import
Click the
icon to open the menu and select Import.A panel will open prompting you to select the JSON file that you wish to import into the system.
Publish the rules after they have been imported in order for them to be live in the system.